Sherpa Render for SketchUp
Everything you need to get going: installing, signing in, rendering from your viewport, straightening your view, what each setting does and what to do when something goes wrong.
What you need
SketchUp for Web does not support extensions. No account yet? Create one for free, you get 5 renders to test with.
1. Install
Sherpa Render is listed on SketchUp's official Extension Warehouse. That is the easiest route, SketchUp handles the installation and keeps track of new versions for you.
From the Extension Warehouse
- 1 Open SketchUp and go to Window › Extension Warehouse.
- 2 Search for Sherpa Render and click Install.
- 3 Confirm SketchUp's prompt. After a few seconds the extension is installed.
- 4 You'll find Sherpa under Extensions › Sherpa Render and on its own toolbar.
Prefer your browser? Open the Extension Warehouse listing and click Install there, SketchUp picks it up.
Toolbar not showing?
Turn it on through View › Toolbars (Windows) or View › Tool Palettes (Mac) and tick Sherpa Render. If the menu item does nothing, check in Window › Extension Manager that Sherpa Render is set to Enabled.
Staying current
When a new version is out, Sherpa says so in the panel and tells you in one line what changed. Update through the Extension Warehouse; to see which version you are on, look in Window › Extension Manager.
2. Sign in
Open Extensions › Sherpa Render. The Sherpa panel appears next to your model, you can move and resize it, and leave it open while you work in SketchUp.
Sign in with the same email address and password you use on sherpa-render.com. Your credit balance and plan then show at the top of the panel.
You only need to do this once: the session persists between SketchUp sessions. Only a refresh token is stored locally, never your password. You can sign out at the bottom of the panel.
3. Rendering from your viewport
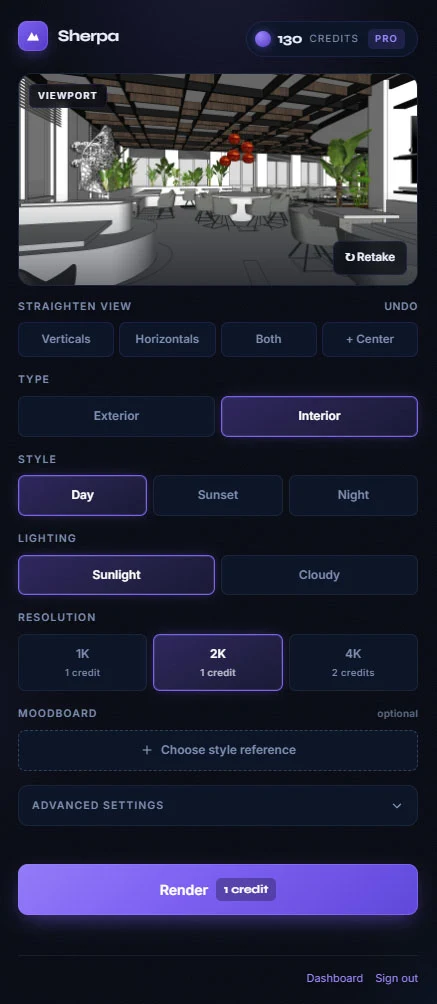
Set your camera
Sherpa renders exactly what you see in your viewport, in your aspect ratio. The clearer the view, the stronger the result.
Capture it
Click the capture area in the Sherpa panel. Sherpa saves your viewport with the long edge at 1600 pixels. Not happy with it? Click ↻ Retake for a new one.
Straighten your view
As soon as a capture is there, the Straighten view row appears. One click and your vertical lines run straight again, see the next step.
Choose your settings
Type, Style and Resolution, plus the advanced controls for lighting, people, styling and materials if you want them.
Click Render
The credit cost is shown on the button itself. While it runs you see progress with a timer; you can leave the panel open and carry on working.
Save your render
Click Save as… and choose a folder. Use + New render to go straight on to the next one. Every render lands in your dashboard on sherpa-render.com regardless.
You get it straight away
A render you start from SketchUp arrives the moment it is finished, on every plan, including a free account. You are sitting in your model waiting for it; that is no place for a queue.
4. Straightening your view
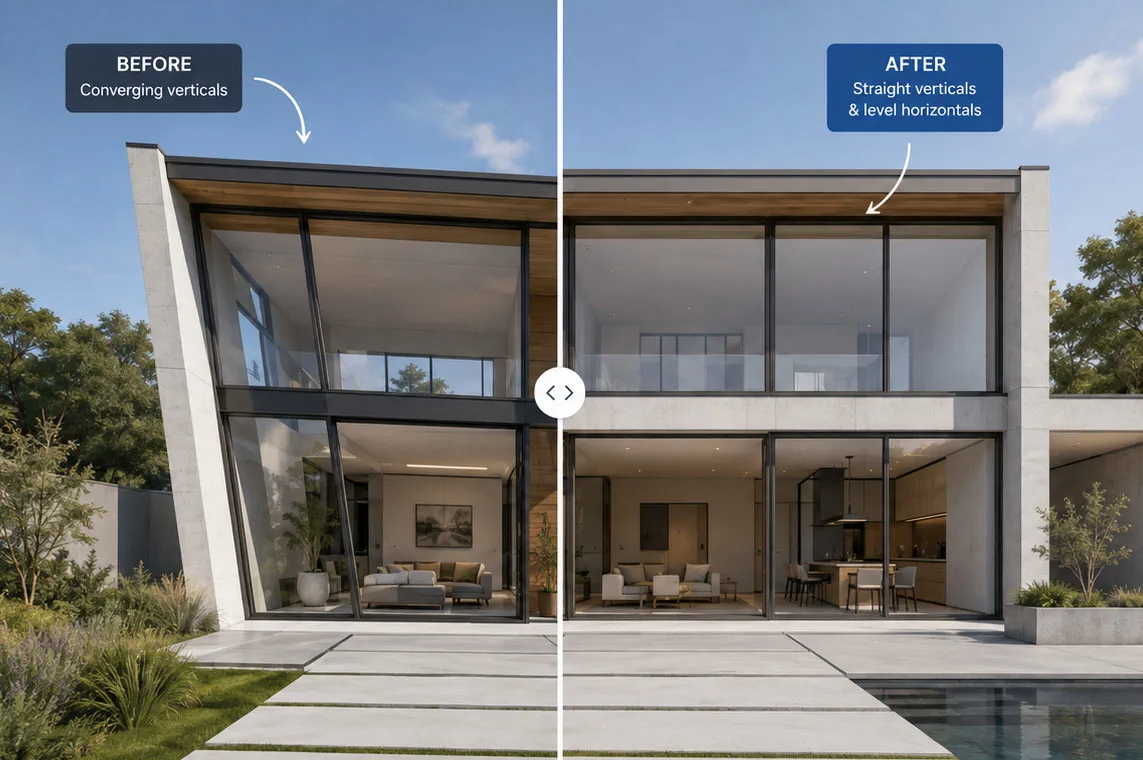
Tilt the camera up or down in SketchUp and the vertical lines of your building start leaning towards each other. That is exactly what gives an image away as a 3D screenshot, architectural photographers correct it every time.
As soon as you have a capture, the Straighten view row appears. Sherpa moves your SketchUp camera to do the work and takes a fresh capture afterwards, so your preview keeps matching what you render.
- Verticals
- Levels the camera so vertical lines stop converging. Your eye does not move. You are looking at the same thing, only straighter.
- Horizontals
- Squares the camera to your model. With a face selected, Sherpa squares to that face instead.
- Both
- Square to the model and level at once. The usual choice for a clean elevation.
- + Center
- Levels, then re-aims and widens the view until your selection sits fully in frame.
- Undo
- Back to your original camera position. Appears as soon as you have straightened something.
Straightening costs no credits and you can try it as often as you like. Nothing renders until you click Render.
5. What each setting does
Some settings only appear once they apply, a moodboard, for instance, shows up for interiors only.
- Type
- Exterior or Interior. This choice determines which other settings appear.
- Style
- Day, Sunset or Night. For an exterior you can also pick Sketch.
- Lighting
- Sunlight or Cloudy. Only appears for an interior with the Day style.
- Resolution
- 1K and 2K cost 1 credit, 4K costs 2. 4K is available from Pro onwards.
- Moodboard
- Optional style reference (JPG or PNG). Interior only.
Advanced settings
At the bottom of the panel sits a collapsed section for directing the image further: the light, the people, the dressing and individual materials. It is there for when you need it, not because you have to fill it in.
The panel is inert until you touch it: leave everything alone and you get exactly the render you would have got without it. As soon as something differs, a customised label appears, and Reset advanced settings puts it all back in one click. Every option is available on every plan, including a free account.
Lighting
The mood and the light in the image.
- Luminosity
- Natural, moody, bright or dark, how light or how restrained the image reads.
- Outdoor light
- Auto, sunny, soft, cloudy or night. For an interior you can also pick no window.
- Colour temperature
- Neutral, warm or cool.
- Artificial lights
- Auto, lights on or lights off, whether the lamps in the scene are burning.
People
Whether anyone appears in the scene, and who.
- People
- No people, female, male, non-binary, group or animal.
- Age
- From child to mature adult. Appears once someone is in the scene.
- Appearance
- Free description, for instance clothing or posture. Up to 300 characters.
Styling
How heavily the space is dressed.
- Styling accessories
- None, or level 1 to 3, from bare to fully styled.
- Styling direction
- Free description of the look you want. Up to 300 characters.
Visual elements
Describe individual parts of the scene in your own words.
- Fixed fields
- Floor, walls, cabinets, countertop, furniture and the exterior.
- Add your own
- Ceiling, lighting, rug, sofa, bed and doors, up to twelve elements in total.
The same controls sit in your dashboard on sherpa-render.com, so a render you start there can be finished with exactly the same direction.
6. Credits
The extension uses the same credit balance as the website. One image up to 2K costs 1 credit, a 4K export costs 2. Your balance sits at the top of the Sherpa panel and updates after every render.
If a render fails, your credits are refunded automatically.
Buy credits or change your plan on sherpa-render.com.
7. When something goes wrong
I cannot find Sherpa in my menu
Look under Extensions › Sherpa Render. If the toolbar is missing, turn it on through View › Toolbars (Windows) or View › Tool Palettes (Mac). If the menu item does nothing, check in Window › Extension Manager that Sherpa Render is set to Enabled.
“Sign-in failed. Check your email and password.”
Use the same email address and password as on sherpa-render.com. If you normally sign in with a magic link, set a password first through Forgot password on the login page.
“Session expired, please sign in again.”
Your stored session is no longer valid, for example after a password change. Sign in again and the session will persist as before.
“No connection”
The extension talks to qheeizjmzhrbtjlnnsot.supabase.co over HTTPS (port 443). Behind a corporate firewall or proxy, allow that host. A VPN that reroutes all traffic can block the connection too.
“This resolution is not available on your plan.”
4K export starts at Pro. Choose 2K, or upgrade your plan from your account on sherpa-render.com.
The render is taking a long time
A render normally takes a few minutes. If it runs past a quarter of an hour the extension will tell you. Credits are refunded automatically when a render fails.
Something else went wrong
Open Window › Ruby Console before you try again, error messages appear there. Send that text to [email protected] along with your SketchUp version and operating system.
Still stuck? Email [email protected] with your SketchUp version, your operating system and the message you see. We'll take a look.
Frequently asked questions
Which SketchUp versions are supported?
SketchUp 2021 or newer, on both Windows and Mac. You also need an internet connection and a free Sherpa account. The extension does not work in SketchUp for Web, which does not support extensions.
Does the extension cost anything?
No, the extension itself is free. Renders run on your Sherpa account credits: 1 credit per image up to 2K, 2 credits for 4K. A new account gets 5 free renders, no credit card needed.
Why can I not select 4K?
4K export starts at the Pro plan. On Starter or a free account 2K is the maximum and the 4K button stays disabled. You can see which plan is active next to your credit balance in the extension.
What does “Straighten view” do?
That row of buttons squares up your view before you render: Verticals makes vertical lines vertical again without shifting where you are looking, Horizontals squares the camera to your model or to a selected face, Both does each of those, and + Center also re-aims on your selection. Sherpa moves your SketchUp camera to do it and takes a fresh capture, so what you see is what you render. Undo returns you to your original viewpoint.
Can I direct the lighting, the people or the styling?
Yes, through Advanced settings at the bottom of the panel. There you set the mood and the light, whether anyone appears in the scene, how heavily the space is dressed, and you describe individual materials such as the floor, the walls or the frames. The panel is collapsed and inert until you touch it: leave it alone and you get exactly the render you would have got anyway. Every option is available on every plan, including a free account.
Where do I find my renders?
Save a render with the Save as… button and pick a folder yourself. Every render also appears in your Sherpa dashboard on sherpa-render.com, whether you made it from SketchUp or through the website.
Do I stay signed in?
Yes. After signing in once, the session persists between SketchUp sessions. Only a refresh token is stored locally, never your password. You can sign out at the bottom of the Sherpa panel.
What happens to my images?
Your viewport captures and renders are never used to train AI models, you keep full ownership of input and output, and files are deleted automatically after 30 days. A data processing agreement (GDPR) is available on request.
More about how it works: AI rendering for SketchUp · common mistakes
Ready to render
Install the extension and render your first viewport. Five free renders, no credit card.